| Inhaltsverzeichnis anzeigen |  |
|
|
|
Working with lists
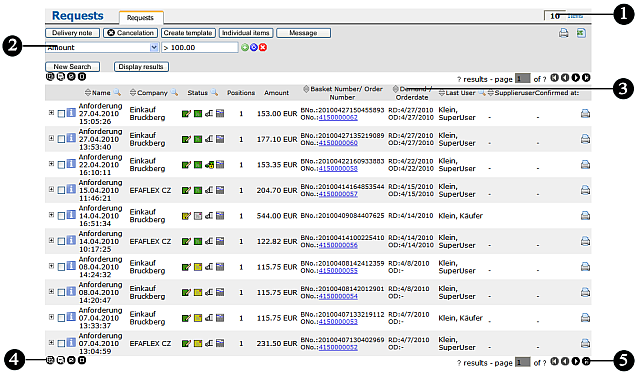
Lists display entries of the same type, such as orders, delivery notes, users or contracts. The individual columns in a list contain detailed information about the entries displayed.
|
Number of entries |
|
Search for entries |
|
Click to sort |
|
Show and hide and select |
|
Browse |
Display detail information for an entry
Click the symbol ![]() to show detailed information for an entry or to edit the entry.
to show detailed information for an entry or to edit the entry.
Display further levels of detail
Some lists may contain multiple levels of detail. For example, the Orders list displays information for the order at the top level, for each supplier at the second level and for each of the ordered items at the third level.
If several levels of detail are available in a list, use the following icons to view and hide levels of detail.
|
Show the next level of detail for a specific entry |
|
Hide this level of detail for a specific entry |
|
Show all levels of detail for all entries on the currently displayed page |
|
Hide all levels of detail for all entries on all pages |


Selecting entries in a list
Check boxes are displayed next to entries when you can select the entries for processing. For example, you can click in the check box to select an order and then create a delivery note for the order. Icons at the bottom left of the list enable you to select multiple entries.
|
Click this check box to select an entry |
|
Click this check box to remove the tick and de-select the entry |
|
Click this icon to select all entries on the currently displayed page |
|
Click this icon to de-select all selected entries on all pages |


Browsing through pages in a list
Long lists may contain many pages. The number of the current page is displayed at the bottom right of the list.
Use the following icons to move from page to page in a list and the question marks to calculate the number of entries and pages.
|
Go to the first page in the list |
|
Go to the previous page in the list |
|
Go to the next page in the list |
|
Go to the last page in the list |
|
Enter a number in the text box to go to a specific page in the list |
? results |
Click the question mark to calculate the number of entries displayed in the list. If you have entered search criteria, this number corresponds to the number of entries found that match the search criteria (see Searching for information). |
of ? |
Click the question mark to calculate the total number of pages in the list. |


Specifying the number of entries on each page
You can specify how many entries should be displayed on each page of a list.

Enter in this box at the top right of the list the maximum number of entries that should be displayed on each page of the list and press the ENTER key or click the Display results button.
Note: If you enter a high number, you may have to use the scroll bar to view entries lower down in the list.
Tip: You can specify the default number of entries that should be shown on each page for all lists. See Changing display settings for more information.
Sorting a list
By default, lists are sorted by the order in which the entries were added to the list. The oldest entry is displayed at the top of the list and the latest entry at the end of the list, with one exception: in status lists the latest entryis displayed at the top of the list. Configuration or client-specific sort orders are also possible for individual lists.
You can sort the list by any column with an underlined heading. Click a column heading to sort the list by this column. The list is sorted in ascending order by this column. Click the column heading again to sort in descending order by this column. Click the heading a third time to remove the sort order for this column.
The heading of sorted columns is displayed in bold text. The following icons indicate the sort order:
|
Sorted in ascending order (A-Z, 1-10) |
|
Sorted in descending order (Z-A, 10-1) |
Searching for entries in a list
A powerful search feature enables you to quickly find entries in a list. Enter your search criteria and click the Display results button. See Searching for information and Defining search queries - Rules and examples for more information on specifying search criteria.
Tip: Click the icon  in a column heading to add this element to your search criteria.
See also |